Alundra - Part 41: Finishing Magyscar
Written on Monday, February 29th, 2016
Posted on Friday, July 12th, 2019
6 min read
Part 1 | Part 2 | Part 3 | Part 4
After a good rest, and no interruption, I go back to that complex cliff obstacle with the thorns and spiked balls!
I make my way to the room with the plants and the chest and get five herbs from the plants!
Now I go to that room, and after two tries, I manage to reach the chest and get the Life Vessel!!!
My health is now maxed out to 24!!!
Thanks to the health upgrade, herbs restore 6 of my health!
I head back to the hall with the two teleporters and take the right teleporter plus one more until I'm at the high ledge where large spiked balls are rising and dropping on the spike pit below.
After a precise leap, which I make, I break some stray pottery, and unlock the door to the next room.
I take care of some more enemies, as I climb further. I notice a chest surrounded by thorny plants again.
I see a torch on a ledge and carry that, but I toss it aside once I notice another torch on the side with a platform and a lever at the bottom of the chasm.
Since my reflexes weren't quick enough to reach the platform before the bomb I planted exploded near the lever, I head south and back to reset the puzzle.
A few tries pass, and I managae to carry the torch to the thorns and collect a Magic Elixyr after using the one I had, since I used earth magic to tangle with some enemies earlier.
Droplets of water fall, with a torch, and a teleporter on a short ledge east of me.
I head to the teleporter after clearing out some hedges.
I'm now near deep waters. I warp back, and clear out the shrubs again.
Another chest surrounded by thorns is in the next room. I press a switch lowering the platforms in the room, dropping a torch and barrel.
The developers really wanted to make things a bit harder, with a lowering floor, huh?
I manage to get some money from the chest.
I jump down into the gap below after failing to make the jump back, which sends me down to the watering hole where I warped before.
I'm now near a chasm full of spikes, and those odd looking platforms make their appearance once again. After taking care of the corpse spawner there, I survey the area riding on the platform.
There are five cracked panels on the spike bed.
After landing on one of them, and (with some painful drawbacks) head up, I use the bombs to destroy one of the panels, which uncovers a small gap.
I bomb the rest, one of them has a hole below. I drop down the hole.
I'm now in a long hall with some pottery along the way, where a teleporter is at the end of the hall. I hope its the end of this cave.
No, it's not! But I'm now at the top of a high cliff near a switch, which I press, opening a tunnel further below.
I'm now back at the canyon near the save teleporter!
After saving, I head directly into the tunnel.
The next room I'm in has four turning switches, a strange looking panel in the middle, and a platform above it.
I hit one of them, where a prompt says, "A strange force seems to restrain the movement of the lever..."
I scour the area, finding tunnels on each end of the room.
I head to the right tunnel. After burning myself while throwing the torch at some thorns, I try again and open the chest on the left end, containing a Magic Elixyr.
Another chest is further on in the right end of the hallway, which has a Wonder Essence.
At the end of the hall is another chest, which has a Strength Elixyr.
I go back and take the left tunnel.
I find the same panel I saw at the chamber before, and four hallways in every direction leading out to teleporters.
I take the northwestern one, which takes me to a dimly lit cavern full of thorns.
I head to the bottom, where a monolith and four chalice torches surrounding it are.
The inscription is hard to make out, so I burn some thorny bushes at the cliffs. There were not enough, so I warp back to the four teleporters room and head to the next one.
It's another dimly lit room with lots of bug mudmen at the bottom! There are also four torches on the cliff I'm standing on, along with four unlit torches at the chasm with those monsters!
I warp back and head to the third teleporter, the southwest one.
A dimly lit room where a bed of spikes, water drops, and torches surrounding a monolith in the middle of the spike bed are there. I whoosh back.
The fourth teleporter takes me to another dimly lit room with more of those corpse spawners, and more jumping spiders out of them!
After taking care of the enemies, I throw the fiery torches onto the unlit goblet-like torches.
The whole room lights up after all the goblet torch things were lit.
I read the inscription: "The modest one gazes downward in the face of evil."
I warp back and finish the rest of the puzzles.
I head to the second teleporter I took and after lighting the room, I read: "The finger of accusation points to the left."
The southwest room is pretty tricky because of the dangers here: a huge bed of spikes, lots of water droplets, and small ledge. But I press on...
I read the inscription: "The eyes of the pious ones gaze upwards in reverence."
I head back to the chamber of the four switches, where I find out that the northwestern switch is the one that's jammed...
What's with this switch!?
I go back to the left tunnel and warp back to the northwestern room. I notice there are three torches, and a lever out on the western end, protected by thorny bushes along the way.
I read the guide again since this room's very tricky to solve...
After finding out what to do, I make it to the lever, which causes fire to drop onto the four goblet torches!
Forget the Ancient Shrine, this is the hardest dungeon ever!
I read the last tablet: "The light of salvation rises from the east to free from darkness those waiting in expectation..."
I'm betting these turn switches get unstuck after their respective rooms are lit...
So the order is:
NW - east
NE - west
SW - north
SE - south
The platform above drops!
After getting more herbs from the room with the plants and the chest, and after recovering and saving, I jump on the platform!
Whoa, this thing's super fast!
I now have to scale a huge cave wall by using the moving platforms there!
I head into the tunnel at the top, where I see a huge L-shaped platform descending fast! I drop down the hole, where I'm now inside a room near the middle of the wall. Enemies are also here too!
Back up, I see a torch and a barrel sitting on a ledge on the left!
With luck and strained effort, the torch burns out the thorns blocking the way and I carry the barrel east, close to its ledge.
The next room has more moving spiked balls!
I proceed and I'm now near a spikebed, and those damned fireball bird statues return! I jump on the odd platform, and move north to a tunnel.
Lucky there are two torches here, as I use one to burn the overbrush, and use another to take out the thorns at the top of the cliff, as I grab another key from a chest!
I leave the room and carry one of the torches outside the tunnel, and carefully make my way to the brushes of thorns on the higher ledges.
I burn the thorns and use the key to move onwards and upwards.
After more enemies have been taken care of, a set of four torches drops! I use one to burn some thorny shrubbery!
A huge chasm lies below...
I jump down!
I'm now in a huge room with a centipede spider thing, as the boss lunges straight at me!
The boss's body armor is hard to penetrate!
My charge attacks seem to rust the boss's body armor though!
This is this game's version of Gohma! This boss can also do tail whips and egg-laying!
The eggs hatch into tiny wasps!
I hit the boss's head, its only weak point, which only happens after I rust out its body shell armor.
What the heck!? It hardened its armor!
I watch the fireworks! It was hard but pretty fun!
I defeated the Corpse Worm!
Now a flash of white...
Now we're at a cavern place with tall grass, and someone speaks to us, another guardian.
Uma: "I am Uma, Queen of Life and Death, and one of the seven guardians. The Murgg came before you and stole the Crest. My servant was so angry he mistakenly attacked you. Please accept my apologies...we meant you no harm. Go forth now, return the stolen Crests and destroy Melzas. You are the last hope of this land. Without you, humanity is condemned to die a horrible death."
She drops two chests, one of which is empty (fricking Murgg)!! The second one has a Wind Scroll, yes!!!
Uma gives her parting words and takes me back, saying this is no place for the living...
I'm back at Jess's house, where Septimus comes and greets us with the news that Meia might know the actual cause of the village's nightmares...
Septimus: "Ronan has been praying to a black force instead of the gods."
What. The. Heck!?
Septimus: "If that is true, we are all in grave danger...we must get to the bottom of this...I'll meet you at the Sanctuary. We need to talk to Ronan..."
Oh my god...
I knew Ronan looked suspicious...I'm betting there was a "good" reason for him to force us into praying to his "gods"...
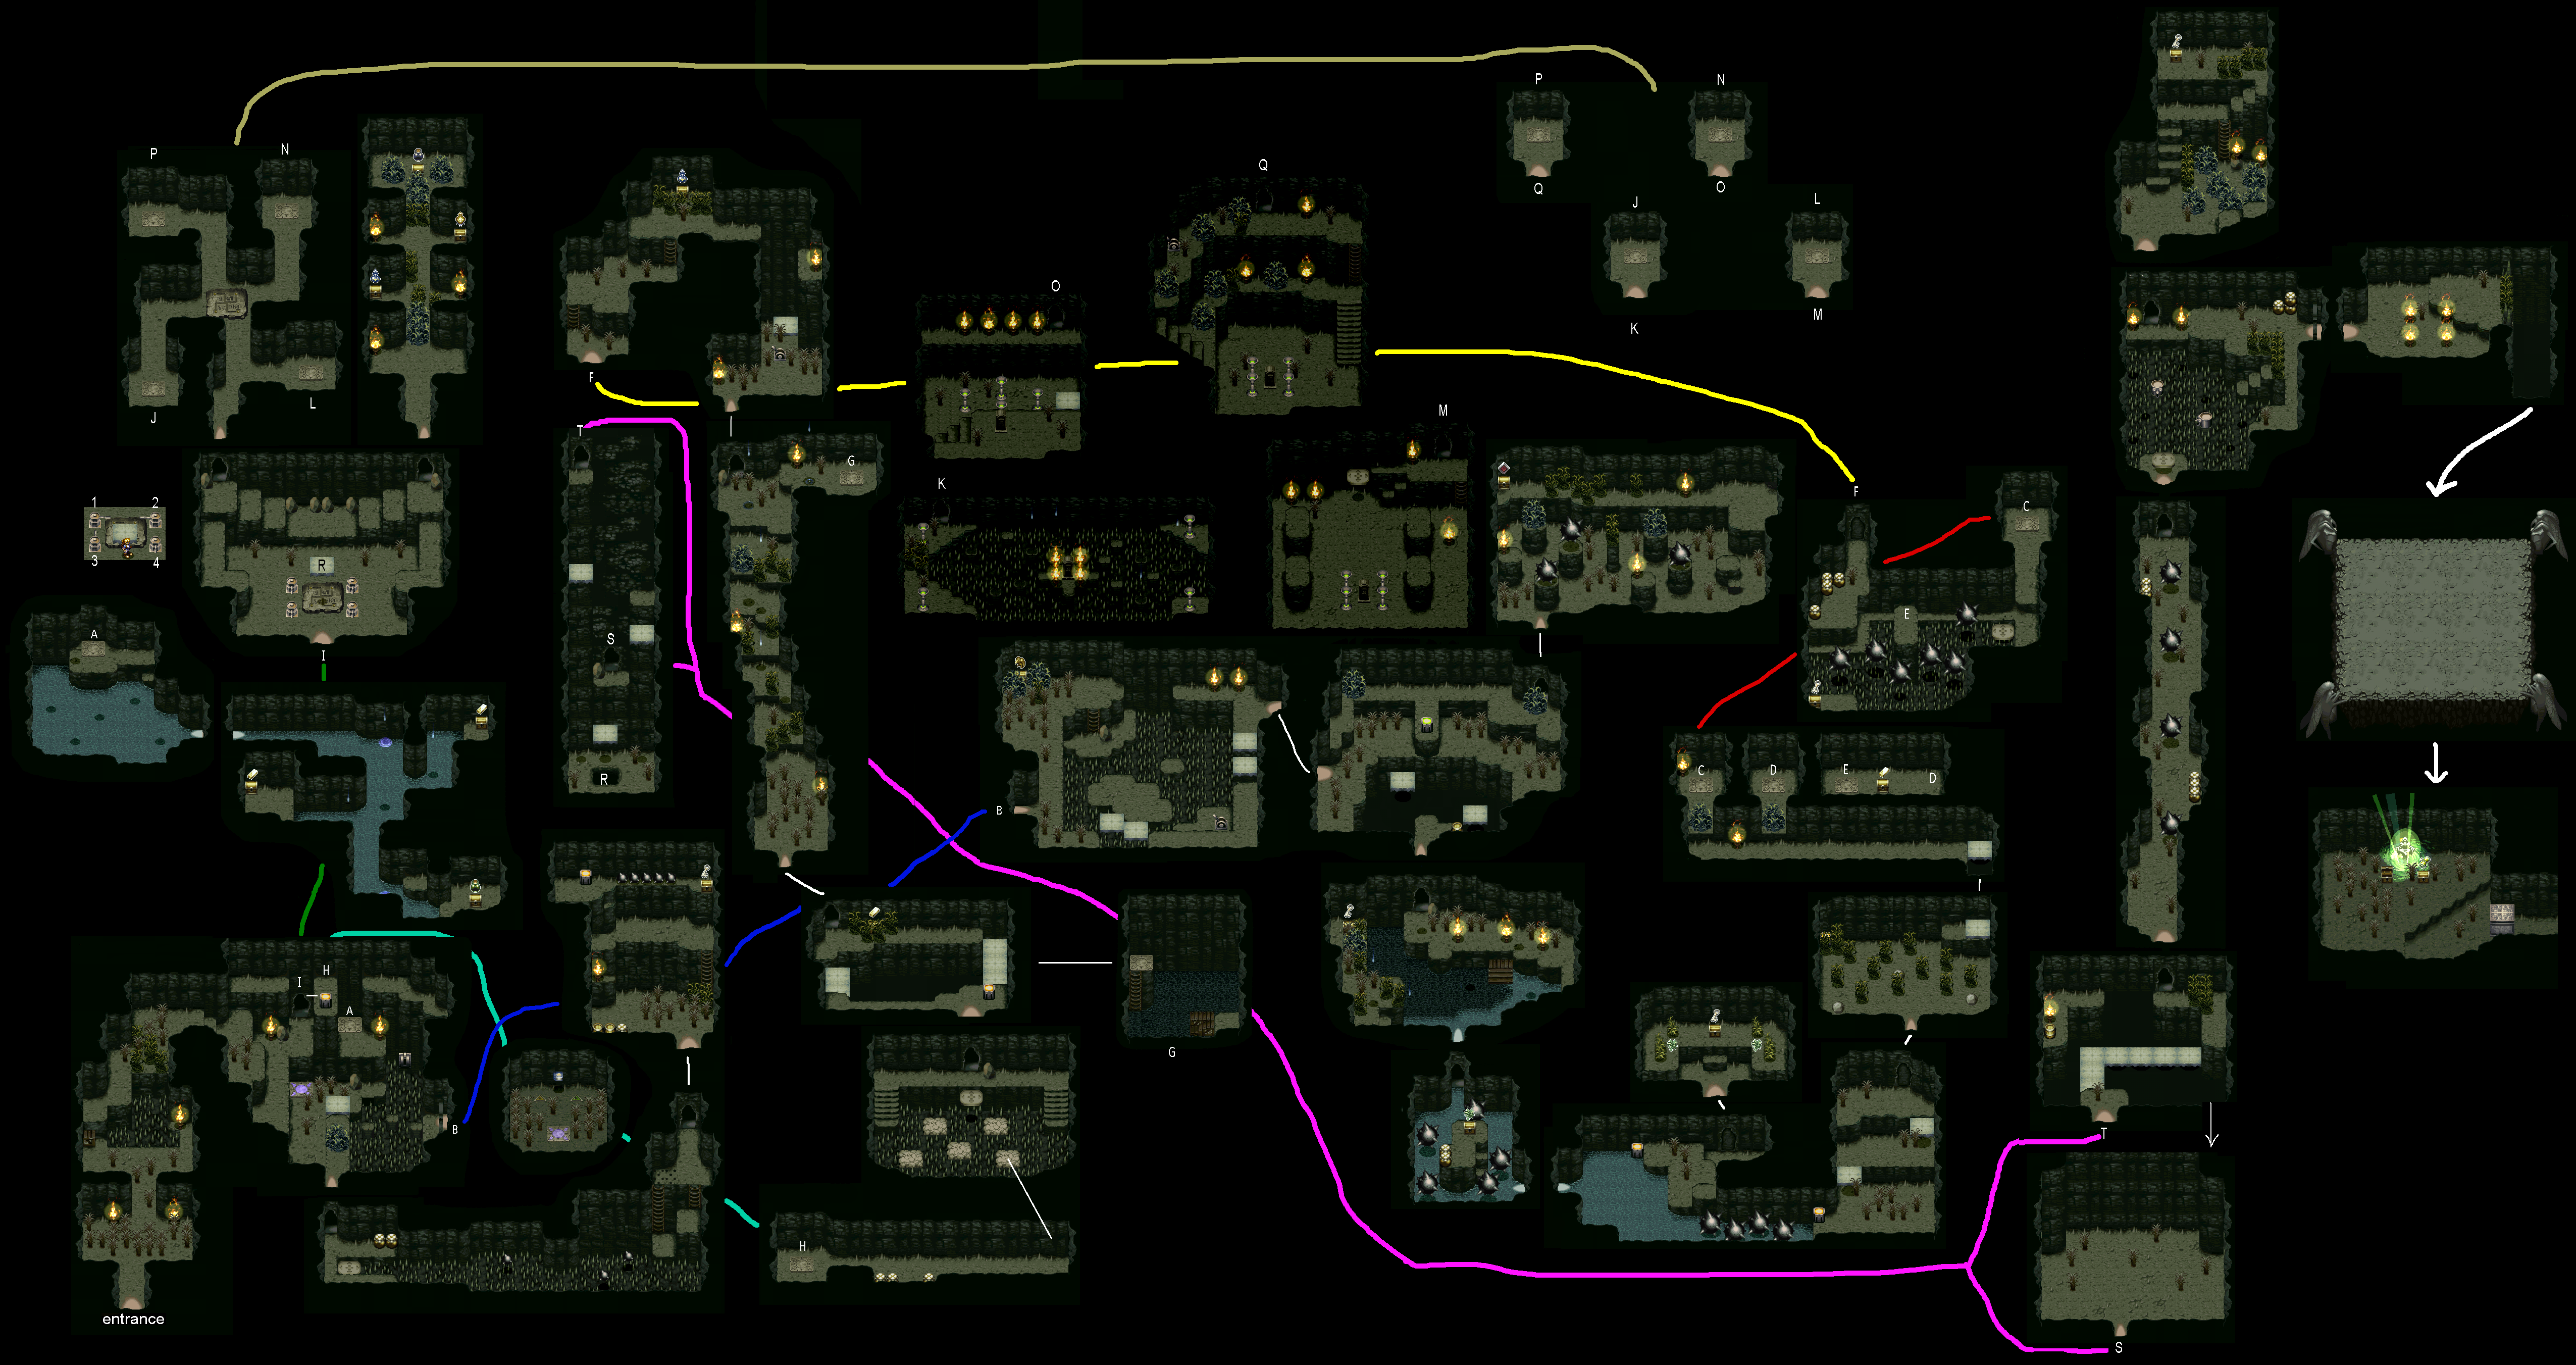
Here's the map for Magyscar, so many passages and tunnels in this one...