Alundra - Part 31: Kline's Nightmare
Written on Thursday, February 25th, 2016
Posted on Friday, December 28th, 2018
7 min read
Part 1 | Part 2 | Part 3 | Part 4 | Part 5 | Part 6
Okay, now I'm back! I head back out from the save spot as I try to keep Alundra from slipping!
I like this piece of music so much that I'll link to it again...
The blue slimes are also up and about!
I head up and right and jump over a few rocks to get to a long, narrow, snowy path full of small, spiked balls!
I safely make my way past them as I head directly into a cave.
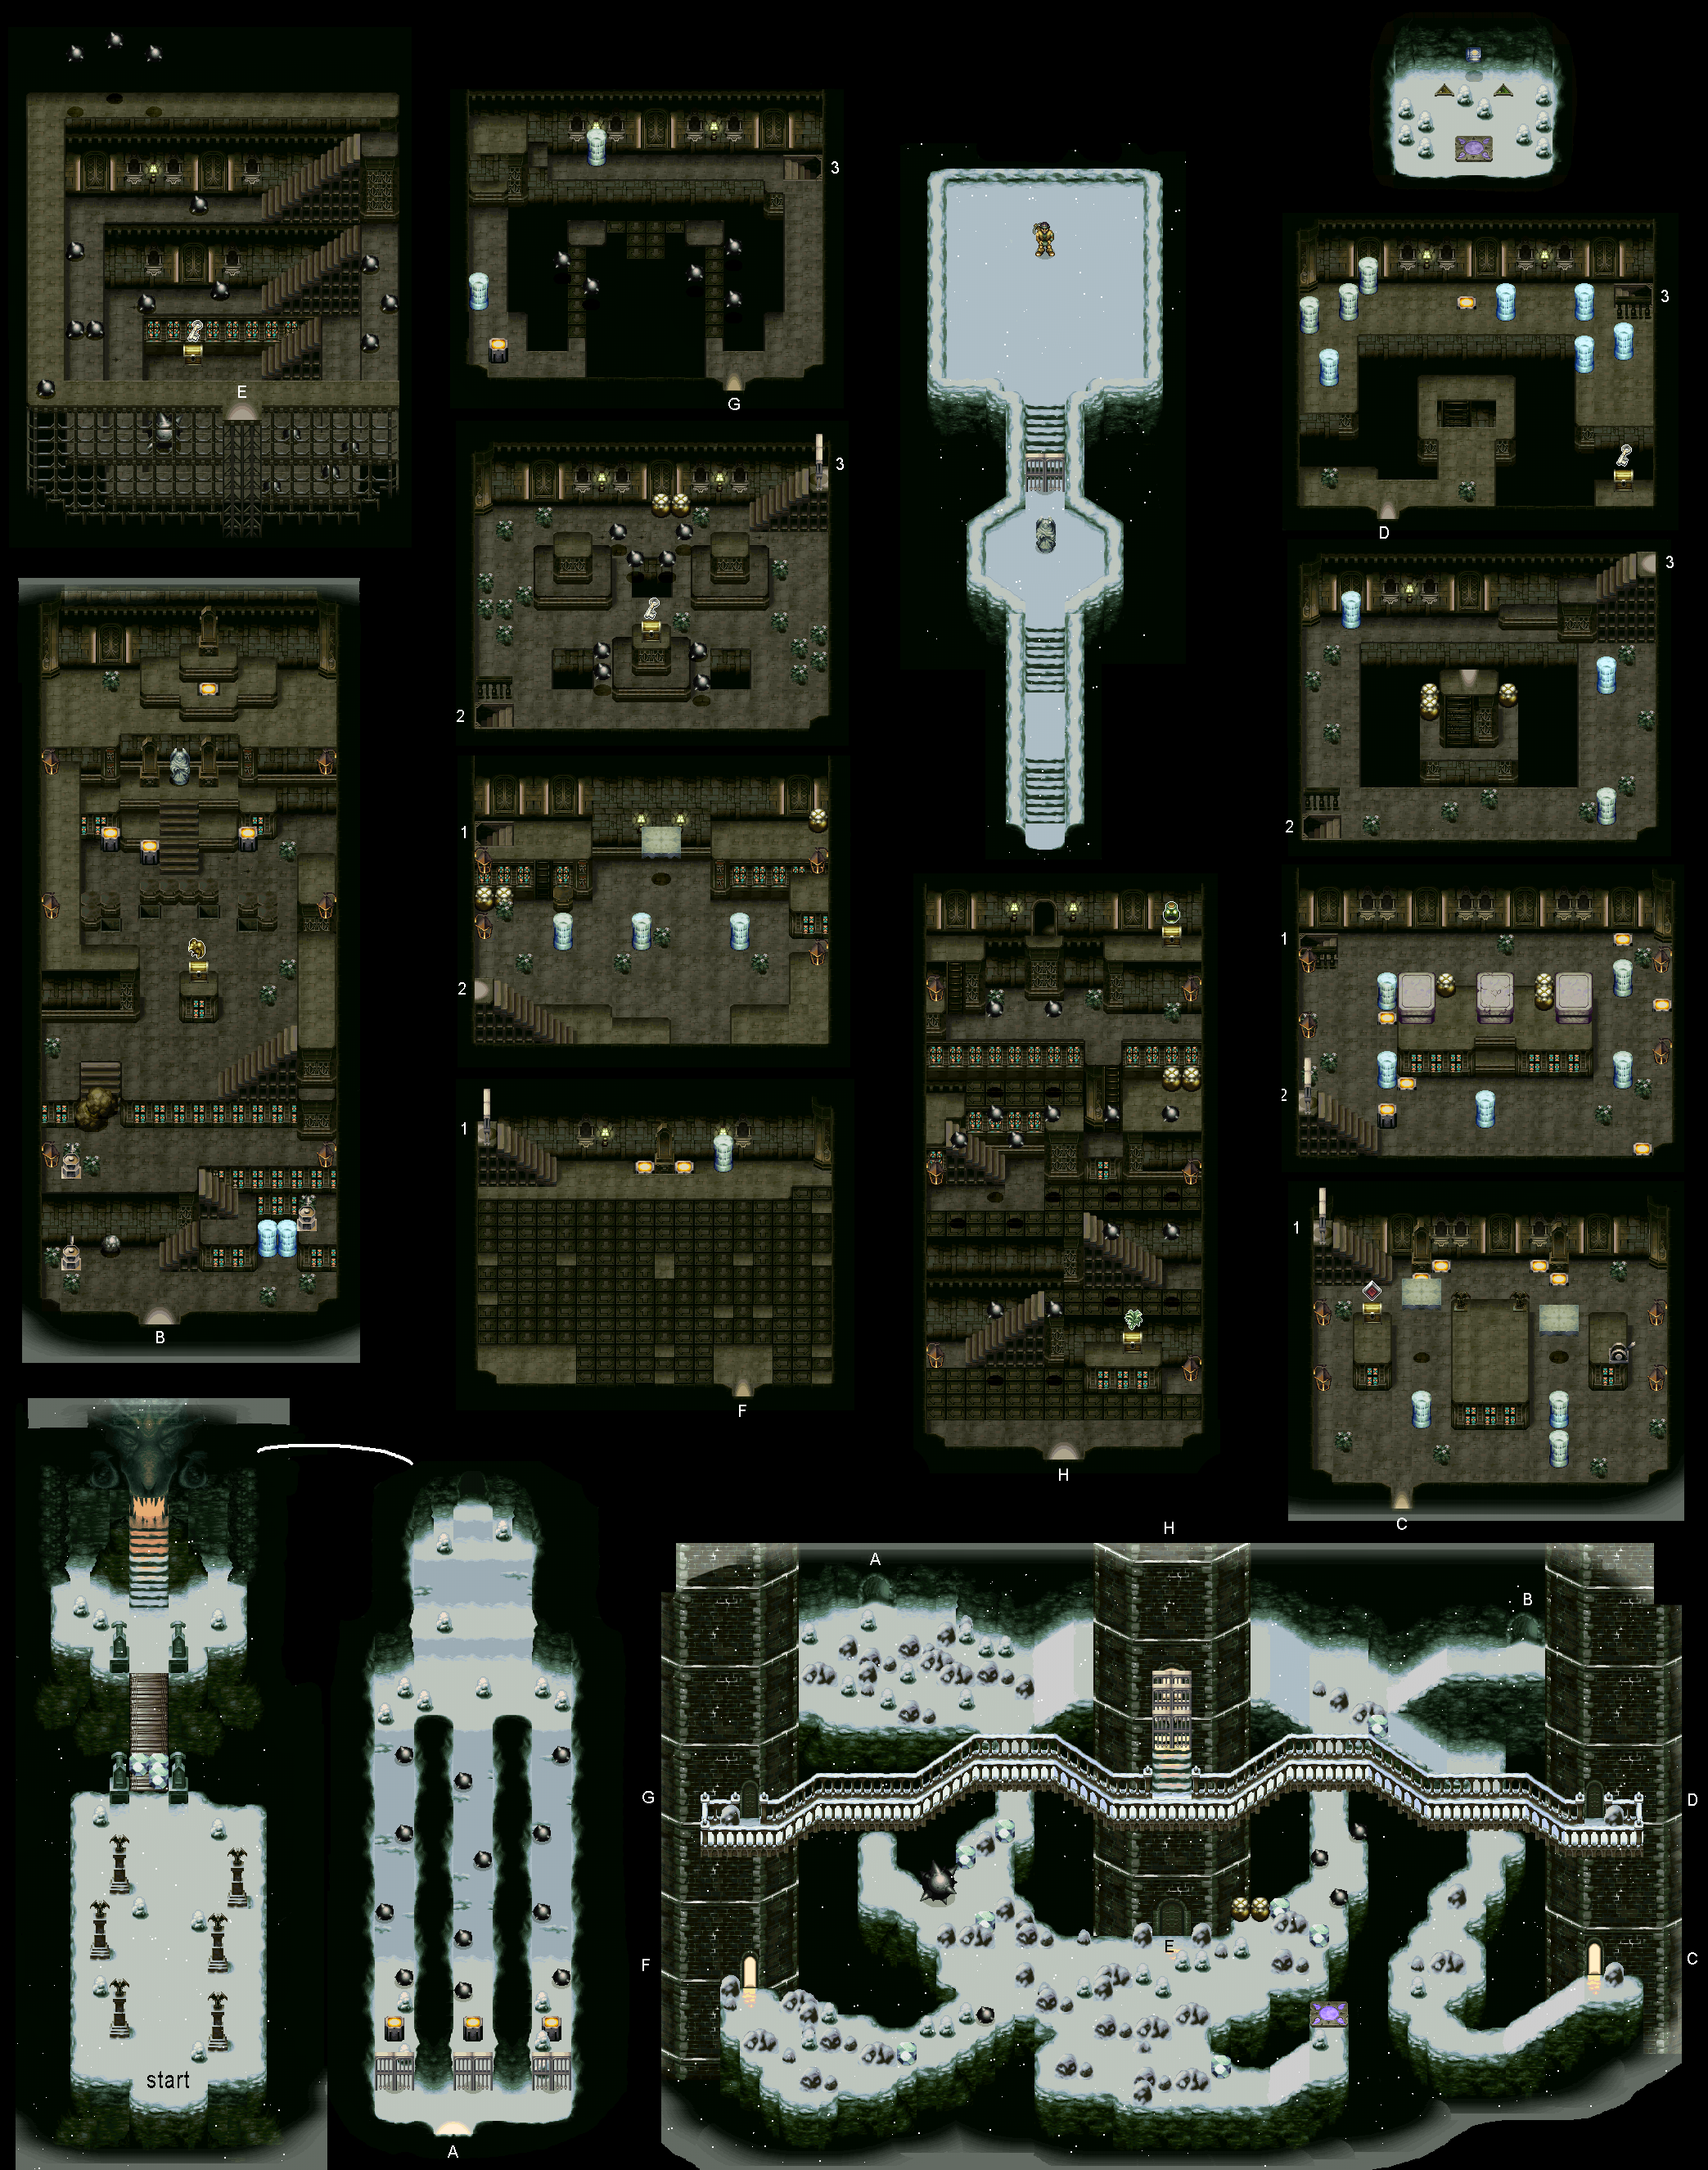
In this cave, it's a room full of stained glass windows with a turning switch on the left and a lot of ice pillars on the right, with a set of stairs in the middle. Some roses are scattered near the switches as well.
I head up as I hear swishing noises.
Oh no, it's more of those Sara gargoyles!
I go back down and hit one of the switches, which controls a small boulder.
I move the boulder to one of the ice pillars. No good.
I redo the whole puzzle again. With care, I move the small boulder to the big two boulders blocking another staircase on the higher ledge, breaking them.
Now to take care of the gargoyles!
Did that gargoyle just do a thing with its mouth? Unsettled me a bit there.
These are easier to take care of though.
I move ahead, and I see three press switches, and a staircase leading to a statue at the top.
I press the left switch, raising a pillar.
I talk to the statue, who recovers my health.
I then press the second switch, raising another pillar, along with the final switch, raising a third pillar.
I try using those raised pillars to cross, but it's not enough.
I land on the crevice where a fourth pillar should be, hearing a heavy click. A fourth press switch reveals itself! I press on that and move forward.
Now I'm at the top, where another press switch, and a gargoyle, no, two gargoyles await.
I press on the switch, causing a door outside to open.
Before leaving I take a Gilded Falcon from a chest. That's now 17 Gilded Falcons...
Some more slippery crossing in the snow as I head east and south to an openly lit entrance...
There are now a set of glowing ice pillars with high ledges here. One on the left end and two on th right. I push one of them by accident as it lands on a press switch!
I eventually mess up and reset the puzzle.
I push the left one first, and the first right pillar second. I then push the second pillar left and up. The third pillar is pushed up as I finish it off.
The gate leading upstairs opens!
Oh great, more gargoyles!
I switch to the sword and take care of them.
There's a set of switches and pillars on the bottom and three raised tablet-like platforms in the raised middle.
I survey the entire room before starting...hmmm...
After a reset and some thinking, I manage to get this puzzle finished, and I head upstairs again.
I realized I could crush those pillars! No wonder why I saw four ice pillars instead of five in that previous puzzle!
After going around the room, I jump over the gap and climb the ladder to the fourth floor, and there are a lot of ice pillars here! I go back down and examine the room carefully.
I accidentally drop back down to the second floor!
I go back to the fourth floor of the tower and head outside. I'm now crossing a slippery bridge to the west tower.
The center tower is locked with three iron gates!
The west tower door is also locked!
I go back to the third floor of the east tower. Nothing. I head back down to the second floor and jump on the middle tablet-like platform, which is cracked. After three jumps, I break it to reveal a hole.
I jump down, where I'm now in the middle ledge.
I jump to the right ledge, where a lever switch is. All that the lever did was raise the right floating platform and lower the left one. After a few tries, I use a bomb to activate the lever and make it to the chest on the left ledge.
The chest has a Life Vessel!!! Now my health is maxed up to 21!!!
I go to the third and fourth floors, and examine them. With no luck, I head back outside to find any other open doors.
I head inside the base of the middle tower. So many spiked balls, big and small, some moving, some not so!
I go around the corner, dashing past three spiked balls from the top, and make my way down.
Yowch!
Now I'm at the bottom, and I open a chest to reveal...a key!
Now for the rigorous trek back up...
With a few bumps and bruises, I go to recover and save.
I head for the west tower. Inside is a bunch of floors with arrows, those conveyor floors again!
After crossing to the other side, I push the ice pillar onto a switch, and three spectres come out of nowhere! Lucky I dodge them, and take care of them!
The sound they make is a high-pitched short noise mixed with a water plop!
I press on the second switch opening the staircase up.
The second floor has blue slimes, ice pillars, and floating platforms aplenty!
I might not explain most of what's happening here with these puzzles, since these might be a bit tricky to explain.
I go back down and up to reset the puzzle, and take care of the blue slimes.
I jump on the moving platform, which falls down immediately under Alundra's weight!
After a few attempts, I make it and head upstairs!
The third floor has small, spiked balls moving either left to right or around a ledge, and a hole in the middle. I check out the rest of the chamber, where there are more small spiked balls, a chest on the top of one of the three ledges, two holes, and a press switch, which I press, revealing another.
A buzzer rings out and the second switch disappears! This must be timed!
I try again, where I hit ten switches around the area in one go, while getting hit twice by the spiked balls, which open the gates up to the fourth floor.
Up here, it's more spiked balls, a huge gap with the arrow floors, three spectres, and ice pillars. Four spectres, actually.
I push the ice pillar and use it as a stepping path to get to a ledge. I then head down the south ledge and press a switch, revealing another platform.
The arrow paths don't show as much resistance as the other ones though!
I jump down, only landing on the bottom part of the ledge in the floor, not even close to the chest.
I try again, though I head to the eastern part of the room, where there's an open door outside. I ignore that area.
The spiked balls are floating near the arrow paths. After a few tries, I make it on top of the chest, where I get another key!
I head outside, recover, and save again.
I climb back up to the east tower to see if I unlocked the west tower. But I didn't.
I'm now getting more familiar with the place now.
Now I climb up the west tower again and open its door.
On the way up I equip the sword, since its charged power is able enough to take care of a slime in one hit!
I now use the keys to open two of the gates, and head into the east tower.
With some thinking, I figure out how to push one of the ice pillars near the ledge where the stairs are.
On the fourth floor, there are eight ice pillars. There is also a chest at the southeastern ledge in the chamber, the last key to open the gate in the middle tower.
This is going to take a lot of figuring out here...
Lots and lots of tries and thinking...
After a lot of effort and thinking, and minus one ice pillar (this might have taken half an hour for me to solve), I manage to keep a pillar on the switch, revealing a platform! I use it to cross the ledge and grab the key from the chest.
It's now time to save Kline!
Now I leave the tower to recover and save, and I head out to unlock the final gate using the last key.
If I could take pictures on the PS3, I'd show the solution of this ice pillar puzzle. Why do you do this, Sony!?
As I climb the east tower, I scavenge for some health from jars and shrubs. No luck.
I now open the final gate and head in!
I'm now in a room with arrow floors, a treasure chest on an eastern ledge on the other side, and stairs on the western ledge.
There are also shadows, or spectres, on the prowl too!
The arrow floors aren't as resistant as the ones in the west tower, thank goodness!
There's also spiked balls here too! What is this dungeon?
I grab some herbs from the chest and move upwards.
As I climb higher, more arrow floors and tiny spiked balls dropping from the ceiling await us!
After lots of boo-boos from the spiked balls and lots of spectre avoiding, I make it to the top where another chest containing a Strength Tonic is.
Here I go!
Back out in the snow, I climb stairs where I meet up with a recovery statue.
The gates behind the statue give way, and I climb up, where I find...
Kline!
There's a huge monster behind him, and Kline asks me for help to get rid of it!
Along the way, six slimes drop down!
The beast swallows them and me whole, and spits me back out, but not without damage!
I can't make the boss swallow the bombs either!
He's only vulnerable when his mouth is open!
I use the bomb to stop him from swallowing though!
After a few hits, Septimus calls out to me! Kline is now screaming in pain! He says we have to leave his mind at once!
*exit dream whoosh*
Septimus confirms that Kline is...he's beginning to transform...
Into a werewolf!
Now another boss battle starts!
The villagers are now gathered around so he won't escape, meaning I'm trapped with him!
He charges so fast, it's hard to predict when he'll hold still!
Now he's beginning to charge into something powerful, as his aura grows fiery, but...
No, Kline!!!
Now everyone's gathered around him...Alundra is weeping...
"Kline was transformed into a bloodthirsty werewolf by his horrible nightmare...He ultimately lost his life to the evil which infiltrated his body...One after another, the villagers were dying. Even more worrisome is the fact Meia continues to speak of a great evil that will consume all..."